Leica M9 Digital Rangefinder Camera - Page 18 Index of Thorsten Overgaard's user review pages on Leica M9, Leica M9-P, Leica M-E, Leica M9 Monochrom, Leica M10, Leica M10-P, Leica M10-D, Leica M10-R, Leica M10 Monohcrom, Leica M11, Leica M11-D, Leica M 240, Leica M-D 262, Leica M Monochrom 246, Leica SL, Leica SL2, Leica SL2-S, Leica SL3, Leica SL3-S as well as Leica TL2, Leica CL, Leica Q, Leica Q2, Leica Q2 Monochrom, Leica Q3 and Leica Q3 43:
Editing images in Adobe Lightroom
By: Thorsten Overgaard. August 2, 2012
The Leica M9, Leica M9-P and Leica M Monochrom comes with a free Adobe Lightroom licence. And a few other Leica cameras actually also comes with a free Lightroom licence (such as the Leica D-Lux and the Leica X2 as well as the Leica S2).
The idea is that Leica Camera AG works close with Adobe on developing camera profiles, and I guess also that working with a digital camera, a workflow tool for finishing the images is mandatory. So why shouldn't it be part of the package of buying the camera?
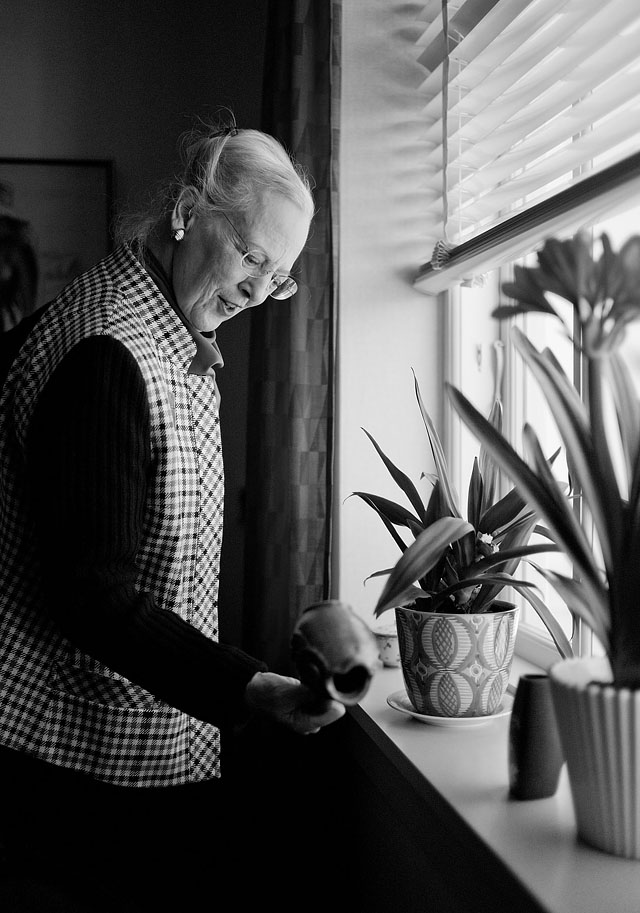
Queen Margrethe II of Denmark. Leica M9 with Leica 35mm Summilux-M ASPH f/1.4. Photo: Thorsten Overgaard, April 2012. Edited in Lightroom 3.
I will try to make this page 18 of the article about editing in Lightroom and will probably expand on it as we get to see and use the new Leica M Monochrom for which no camera profile yet exist. And no experience with monochrom sensors at all.
Please note that my viewpoint on software and computers is as my viewpoint on cameras. I want the best and I want simplicity. So where we may all have gotten Leica cameras to get the best and get simplicity, the viewpoint on computers and software can be very different. So when I do this, I do it from the viewpoint that Lightroom is a workflow tool, basically just a RAW converter that converts numbers from a sensor into colors. All other use so as to fix stuff, create websites, organize photos ... all that you will have to go elsewhere to find, because I don't use LR for any other than RAW conversion.
Stay organized: Lightroom is not a catalog software
First off, as a quick advice, Lightroom is a RAW workflow tool and work in realtime and uses previews. It is not a powerful, fast tool as such.
Realtime mean that is does editing in realtime, adding editing data to a file attached to the always untouched original RAW/DNG file. It also mean that if or when you move around files, it does so in realtime on the harddrive.
Previews mean that is creates previews for the screen so as to work faster, and those previews are saved in the Lightroom Data file next to the actual catalog. The previews fill up, slow down overall performance and make Lighttroom unsuitable as a catalog for overview.
| |
|
|
|
|
| |
Buy the new eBook
"A Little Book on Photography"
by Thorsten von Overgaard |
|
| |
|
|
|
|
| |

Order now - Instant delivery.
More info
★
★
★
★
★
★ |
|
It's a humorous understatement to call this
new eBook by Thorsten Overgaard for
"A Little Book on Photography".
It's a grand book, a history lesson, life experience, a biography and poetry book and brilliant photo book!
All in one beautiful package of 180 pages
to fire you up and get you to love
photography ... unconditionally!
"A Little Book on Photography"
eBook for computer, Kindle and iPad.
New release March 2017.
Intro price only $47 - 180 pages.
| |
|
|
| |
Buy Now

Instant Delivery |
|
| |
|
|

|
|
| |
|
|
Therefore, for organizing files, previewing, reviewing which files to use where, adding more keywords, writing captions, finding and sending files, you want a virtual catalog that can show you images without actually including them in the catalog data, without changing their locations, without changing their look, etc.
One such software is the Media Pro 1 which you can download a free 30 day trial of from captureone.com
Media Pro 1 is also the software for editors and others who need to review many image files and want to do so in large view (instead of taking Info (cmd+info on a Mac) on each file to see a small preview). In short, Media Pro 1 is the way to organize a large number of image files lying in many folders across harddrives.
If you manage several harddrives with images you may find it useful not to have one large catalog on your main computer (catalogging several drives) but to have one Media Pro 1 catalog on each harddrive so it is a stand-alone harddrive. This will make things easier as your image libraries move around (for example if you merge several harddrives onto one new larger harddrive, which is likely to happen as time goes by and 1TB harddrives become 10 TB harddrives). Also, Media Pro 1 and other catalog software rely on the address of the file, so if or when the name of a harddrive changes, that breaks the link to the file. So you will want to find a way to organize things so you can move images and catalogs without breaking the links (and one is that the catalog and files are on the same harddrive).
Exporting from Lightroom for web or print
There are two settings that are useful when you want to export your final image. One for web/facebook/mail and one for print.
To export an image you go File > Export ...
Web resolution is 72 lines per inch which is the resolution of screens. The Retina screens are 240 lines per inch on iPhone and 140-180 lines per inch on iPad and Macbook. But a normal Macbook and other computer screeens are 72 lines per inch.
It is likely the web will be updated in the coming years to higher resolution, but so far only 72 lines per inch exist (the Retina displays upscale the images to higher resolution, which looks rather bad, or you use your Retina display to view a larger area and keep the screen resolution to 72 lines per inch).
The 72 lines per inch is good for Facebook, sending files per e-mail and other mail and web based sharaing.
Print resolution is 300 lines per inch traditionally, though some times it is good to do 400 lines per inch for modern printing. This is the resolutoion to make high res print in offset or inkjet.
You should regard your 300 lpi JPGs saved in highest possible quality as your final originals as these are your final edited files in the highest possible resolution. And you should always export everything from Lightroom in this size as you can only export new files from Lightroom (or Aperture or other RAW/DNG conversion software) as long as the RAW/DNG format is supported. Currently this is the standard, but you are dealing with computers why this standard may change in the future. Hence you will have to export final originals you can use as originals.
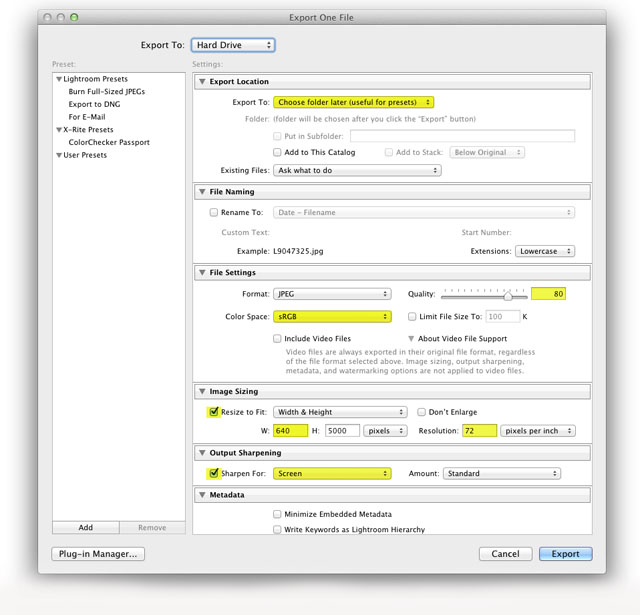
For web you set quality to 80, Color Space to sRGB, resize to whichever widt you prefer as your standard (my standard is 640 pixels wide as that is the format for my website) and set the hight to 5000 or some other so the image is always the same width and the hight is never cropped. Screen resolution to 72 pixels per inch. Sharpen for Screen (Standard)
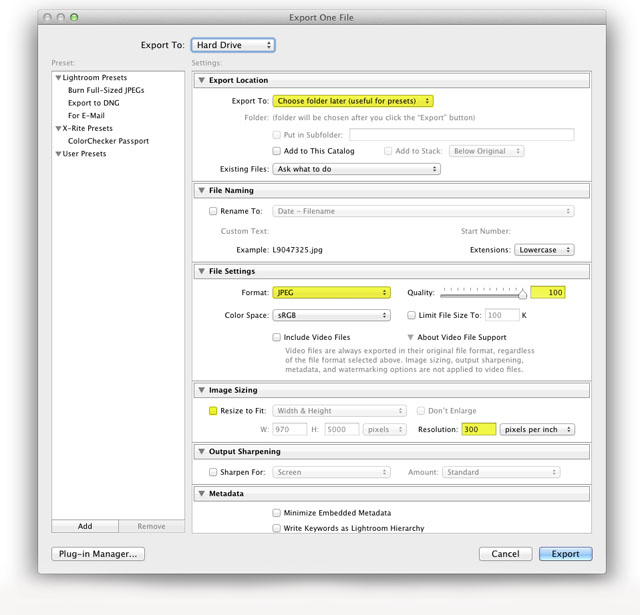
For print you set quality to 100, Color Space to Adobe RGB (most colors) or sRGB (most compatible), set to NO resize . Resolution to 300 pixels per inch. NO sharpening as magazines and newspapers will prefer to apply their own sharpening tools so all images printed look the same. Never saharpen your general originals, only sharpen for specific use when using an original image.
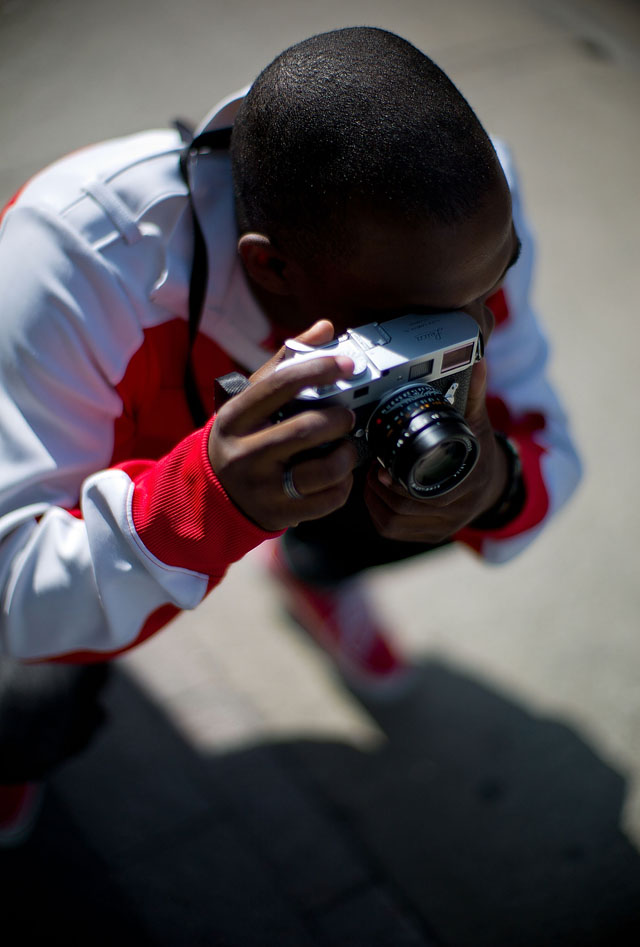
Sgt David Bromley of US Army photographing with his Leica M9-P in Toronto, September 2012. Leica M9 with Leica 50mm Noctilux-M f/1.0
Shifting from Lightroom 3 to Lightroom 4
First off, here is a video podcast I did with Adobe beta-tester Alan Gilbertson, a graphic designer from Scotland who lives in Los Angeles. We met a few weeks ago and talked about the pain (I feel) of having to go from Lightroom 3 to Lightroom 4 where the adjustment controls are different, and he knew some things I didn't. Hence, we agreed to have a chat on it for open microphone so we could share with more people.
I should warn that it may be more of a conversation with a few illustrations on screen, rather than an actual video demo. But I hope you enjoy, and feel free to write to me at thorsten@overgaard.dk with questions or suggestions for what to cover next in editing digital Leica M files.
Shifting from Lightroom 3 to Lightroom 4 using Leica M9 and Leica M Monochrom from Thorsten Overgaard on Vimeo.
The conclusions, in short
If you want to know the short answer to the questions about Lightroom 3 to Lightroom 4, let me try to give it to you. The overall conclusion is that Lightroom 3 will do fine as nothing really changed. The Leica M9 and Leica M9-P profile is still the same, just the controls are different in Lightroom 4. And in exchange for having the pain (as I say it, because that is how I feel it) of learning different control tools to achieve the same, maybe you will get more capabilities.

The Lightroom 3 file to the left and the Lightroom 4 file to the right after the update suggested by Adobe Lightroom. Leica M Monochrom with Leica 50mm Summilux-M ASPH f1.4, 5000 ISO.
Don't update the files
An important conclusion for me is that despite Lightroom 4 suggest you update all your files to the "new and improved look", don't event hink of it! My viewpoint on this - that might apply or not apply to what you work on - is that I already edited my images back when I took them, to a look I decided was good. It is possible that some of my images would benefit in some way or another by an update, but to find out if that was the case I would have to update each picture, review it, try to edit it towards a new and better look, and then eventually revert to the look I made in Lightroom 3.
If it isn't broken, don't fix it
First off, I don't have time to review all my files. And secondly, I was satisfied with them when I edited them last time, so that is the look they have. My favorite excuse - or justification - is that if you take some of the pictures hanging in museums, many of those are grainy, out of focus and doesn't exatly display a broad dynamic range (range of tones in an image), but they are just fine, and that's why they are hanging in the museums. So if an image was finished in Lightroom 3 or Lightroom 2 to have a look that made an impression on you that made you decide to keep it, that image probably still have those qualities.
Also, look forward. There is so much to photograph and so little time. And much of workflow and editing is about how to get the job done with the least time spent in front of a computer.
Advertisment:

Lightroom Survival Kit Video Tutorials
You might also find these videos intersting about editing and workflow in general I provide as an extra bonus for those who have bought my Lightroom Survival Kit.
Lightroom Survival Kit · Editing London Photos · Part 1 from Thorsten Overgaard.
Lightroom Survival Kit · Editing London Photos · Part 2 from Thorsten Overgaard.
Editing black & white photographs from the Leica M9 in Lightroom 3.6 [HD] from Thorsten Overgaard.
The Leica M9 and Leica M-E story is to be continued ...
Read about the Leica M9-P --- >
Read about the Leica M Monochrom --- >
Read about the Leica M 240 --->
|
![]()
