By: Thorsten Overgaard. March 16, 2017. Most recently updated June 30, 2023.
Add to Flipboard Magazine.
I have more than 110,000 pictures on my phone from my photo archive. Here is a quick how-to guide syncing your own photo archive with an iPhone (and how to free yourself from Apple Photos App)
I don't use Apple Photo (or Apple iPhoto as it was called in the pas) on my computer or iPhone. What I do with all my photos I take with my Leica and Hasselblad cameras, and the few I take with my iPhone, is that they go into a standard workflow:
I import pictures from my camera into Lightroom or Capture One Pro. Each event has it's own event number (or job number), and that's how I organize my photographs. An event is a trip to a place for a day or a fe days, or it is a portrait session. Making event folders with job numbers for each even enable me to a) finish an event completely and move onto the next one, b) thus complete work in Lightroom or Capture One and move the finished event out of the software and into an archive of final pictures, and c) job numbers give sequence in the archive so it is easy to find things in the future. Much more about this well-working and well-tested workflow in my Lightroom Survival Kit and Capture One Survival Kit that I have written, updated and refined since 2010.
Today's article is on how to sync your own photo archive to your iPhone, while avoiding the sticky Apple Photos software. And also with a note on how to clean out your iPhone for photos, as well as how to clean out Apple Photos for photos (both software's are extremely sticky and tend to doublet and keep your photos).
The computer is a work tool, not a storage device
I use my computer as a tool to edit photographs, not as an archive: Once I am done with a complete event, I export that event to external archive as a Lightroom stand-alone catalog (including all photos from that event).
I also export three sizes of final images, ready for use, with keywords, camera data and all: Two sizes for web use (one size for my website, one size for Facebook, Flickr, etc), and a high-resolution edition in JPG, 100% size, no sharpening, with all keywords and gps info in the file.
The high-resolution is ready for print for galleries, for magazines and is my “new original” that exists as a final, edited version that keeps existing independent of Lightroom software, file formats like DNG and RAW, etc.
Apps are tools for editing, not for storage
I only use Lightroom and Capture One for editing my pictures. I don't store my photographs in applications, but in my own hard drives.
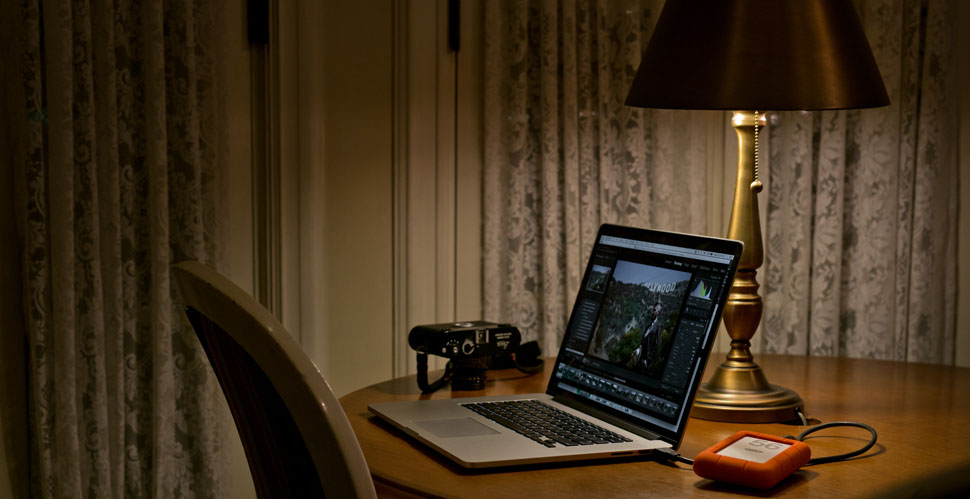
The key in my workflow is speed and independence. You can read more about that in my
Lightroom Survival Kit.
Much of digital workflow resembles when we used film
Once done with editing my photographs, I don't need to travel with all my DNG/RAW files. Those are in the archive and backed up.
In the old days when we shot film, we would put negatives in an envelope with a job number and description, then store it in a safe place. Nobody ever packed their negatives down and traveled with them. Same with digital negative files: Don't keep them “handy” on your computer, in a software application. Export them out and store them in a safe place in case you need them later.
The only pictures I need to “bring with me” are my final JPG high-res editions of my final pictures. Those are the ones I selected and edited to final versions and exported in three sizes so they are ready for use on web, print, exhibitions, etc.
My archive of my high-res originals is about 1TB, so I have an external 4TB drive with my pictures, iTunes music and iTunes movies. In other words, my computer is not cluttered with music and pictures.
I synchronize iPhone via Apple Music (formely known as Apple iTunes) using an external hard drive that holds my archives
When I synchronize my phone with Apple Music (formly known as Apple iTunes), I have my external drive connected. Then I can synchronize the music and playlists I want to. I don't have automatic downloads turned on for the iPhone as that will mess up the archive on the phone and makes me unable to add/remove music.
My "workflow" with music is the same as my pictures. It's my music, so I keep it in my archive, organized my way, and sync from my own archive, not from a cloud.
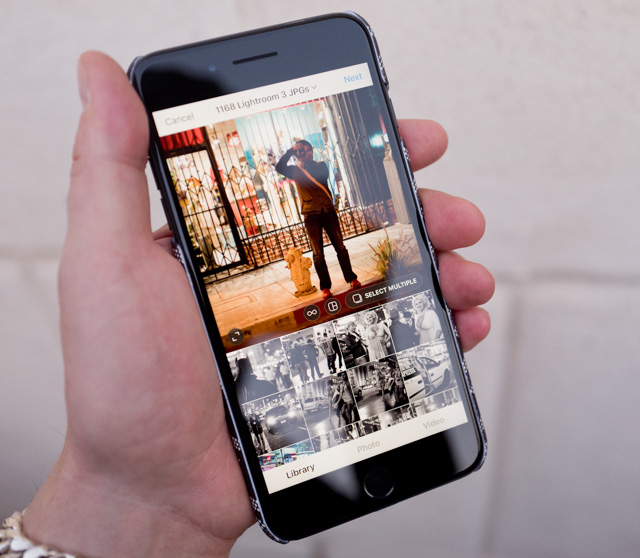
My entire library of more than 110,000 pictures are organized on my phone in one picture folder, with sub-folders that refer to each job I've done. From there it's easy to mail, post on Instragram, etc. In this picture it's Job no 1168. My actual photo archive on the big hard drives is more than a million pictures; the 1100,000 pictures are the selected ones that I consider "final pictures" for use. The rest is digital negatives that didn't make it to "final pictures" for use.
Here are the steps to sync the iPhone
using your own external archive
1) My entire photo library synchronized with the iPhone
Connet the iPhone with a cable to your computer and then synch with either Apple iTunes (old system) or via the Finder (new system).
1a) The Finder way (new)
Once you connect the phone, open a new Finder window (press "Command" + "N") and select the iPhone to the left. And then click the Photos tab:
- Select to synchronize photos from a folder on the hard drive, or an external drive (all sub folders will be included).
- Choose to sync either "All folders" or "Selected folders" (in which case you click the ones you want to sync).
- Press "Sync" or "Apply" and leave it alone for a long while so it can complete the sync.
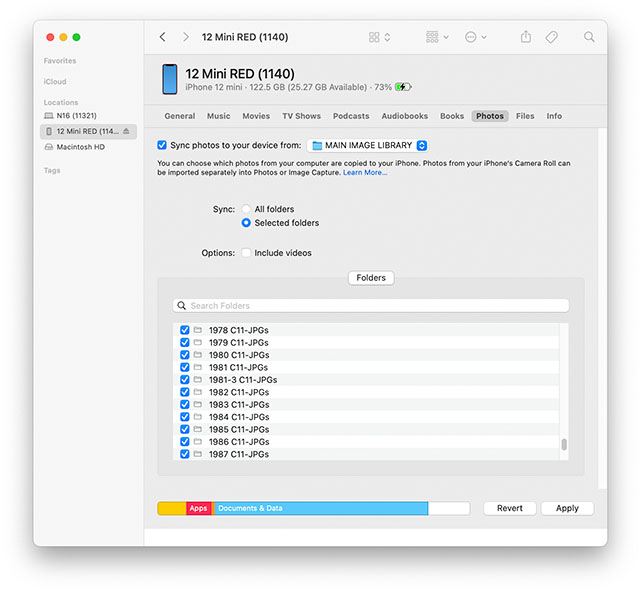
Depending on whether you sync with an iPhone, an iPad Pro, etc., the images will be resized for that device. That's how 1TB of high resolution photos doesn't fill more than 30-50GB on an iPhone.
1b) The iTunes way (old systems)
If you still have iTunes on your computer, then connect a phone and open iTunes. First set it up so you back up to "This computer" and "Sync only checked songs and videos":
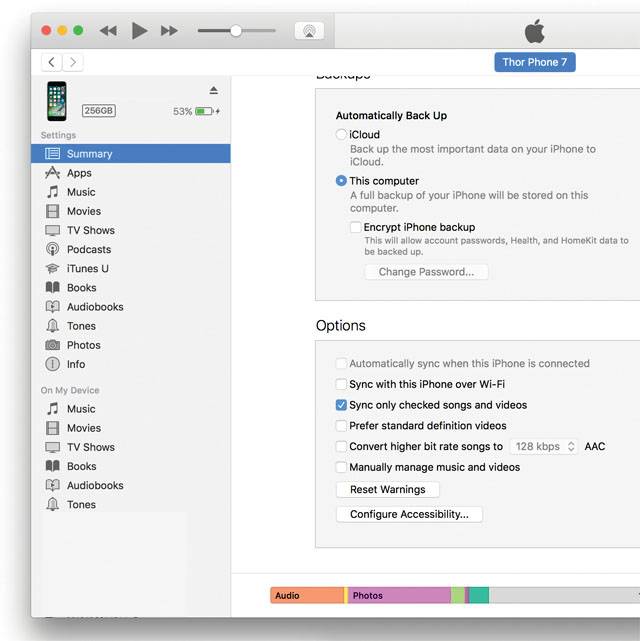
By default, the iPhone is set up to sync with the iPhoto / Apple Photos, so you have to change that to your own folder with your photos.
- Select to "Sync Photos".
- Choose which folder to sync from a folder on the hard drive, or an external drive (all sub folders will be included).
- Choose to sync either "All folders" or "Selected folders" (in which case you click the ones you want to sync).
- Press "Sync" or "Apply" and leave it alone for a long while so it can complete the sync.
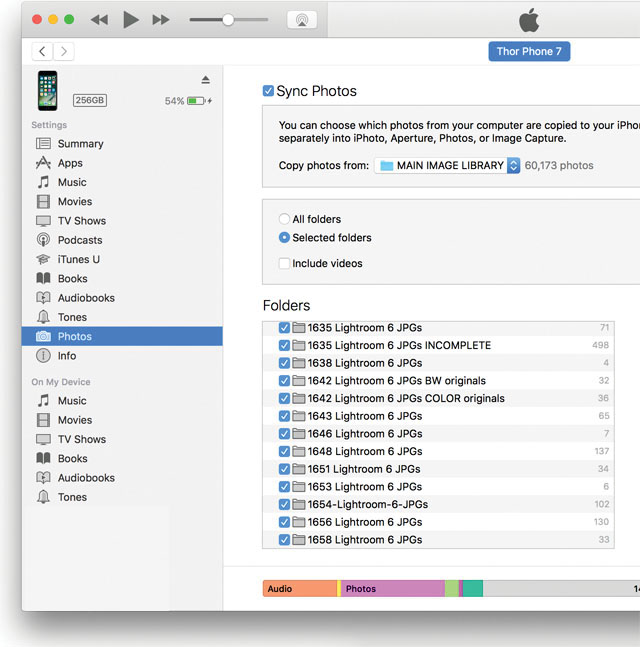
2) Now I have 110,000 photos ready on my phone for mail, Instagram, etc.
They are in Photos on the iPhone, but photos taken with the iPhone is not automatically sinces to the folder or anywhere else. Apple Photos on the phone is just a disconnected app that contains photos synced manually.
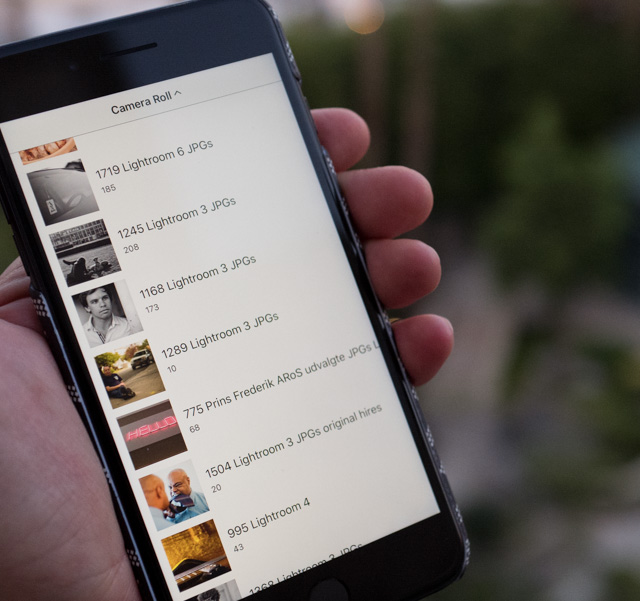
My photo archive on my external hard drive is organized in sub-folders, which is how I organize my archive as part of my overall workflow. The folders stay the same on the iPhone, though the iPhone for some reason doesn't know how to show them chronological or sort them after numbers.
Below each folder I can see how many photos that folder contains. Note that I sync from my high-resolution archive (10-25 MB per picture) and iTunes automatically downsize them to iPhone Plus size (or iPad Pro size if I sync to that). That's how 1TB of pictures only fills up 30-50 GB on the iPhone.
3) Now I can post my actual photographs
I will some times post something I am enthusiastic about and wants to show the world, but generally I try to post something that others may be anthusiastic about. In my case it's my photographs from around the world. I travel to more than 25 countries a year, taking photographs and teaching photography. I will rater show some of those than the Cappuccino cups and funny signs I used to post when I was new to Instagram.
That's the reson why I want my picture archive to be on my iPhone, rather than taking iPhone photos.
On another note; Apple devices will self-destruct, eventually
Apple software generally has a problem with large data. You must realize that from time to time you must erase your whole iPhone and reinstall it again from the backup as the synchronization can't handle removing/adding large quantities of pictures, music and sometimes addresses. It's just a fact and steem from when the apps was programmed long ago. Wasn't scaled to the amount of data we often operate with these days.
The Apple philosophy seems to be that you don't need an archive. You just connect to Apple Music and iCloud and then you stream away. Needless to say, I disagree with that attitude: If Shakespeare has used iCloud for his plays and his writings, there would be no Shakespeare today.
As a creator of music, photographs, writings, anything, you need to ensure that you have an archive of your things that you are in control of. You cannot leave it to a paid (or unpaid) service to save your originals
Likewise, if you have ripped your entire music collection from CDs, you need to keep your own archive of it and organize it the way you think it should be, not let it be overrun by a cloud service.
Apple iPhone doesn't know keywords
| |
 |
| |
The search function in the iPhone currently does not support keywords in photographs. It only comes up with apps, songs and a few other things when you search. |
| |
|
Pictures that are sync'ed to the iPhone or iPad Pro may contain keywords. You should think you could find pictures by searching keywords, but that's not a feature yet in the finder of the iPhone, nor in Apple Photos on the phone. I'm sure it will come one day, just like Spotlight on the computer can be used to type in keywords to find the photo you are looking for.
The funny (or good thing, I suppose) is that the keywords and all other data in the photos, stays on the photographs when imported to the iPhone, as well as when exported or e-mailed from the phone.
Keeping the computer space clean
If you have iTunes you should go iTunes > Preferences > Devices from time to time and clean out older backups you don't need. If you've never done so you will find many old backups taking up space for no reason.
Your backup is not the actual content of your phone but usually just a directory of the content the phone sync'ed from other devices. So a 256Gb phone is not 256GB, but likely "just" 10GB or 20GB of data per device, per backup (so if you have 5 previous backups you don't need, that's 50GB - 100Gb you can gain back).
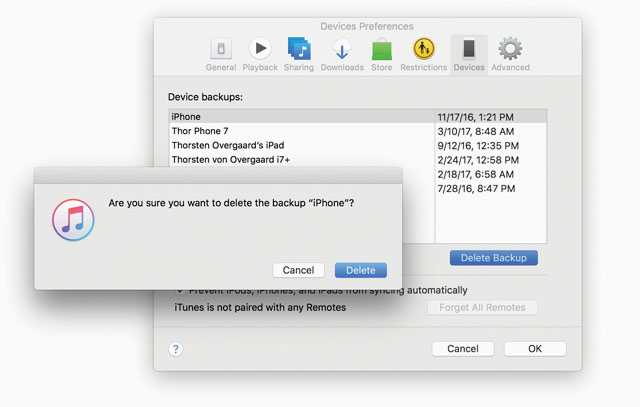
Clean out old backups in iTunes you don't need anymore and gain back hard drive space (5GB - 20GB per device, per backup!).
If you have a newer system, open the window in Finder and choose the iPhone and then the "General" tab > "Backups" > "Manage Backups" and then delete the ones you don't need.
| |
|
|
|
| |
Make backup to your computer, not iCloud |
|
|
| |
By Thorsten von Overgaard |
|
| |
|
|
|
The iCould is part of the problem with you having large amounts of data, or many files. Do the backup of your iPhone to your computer from time to time so you have it ready for reinstalling the iPhone.
At some point the iPhone just loses track and stop working. Music you asked to be removed is still there, music you thought had synced isn't there when you want to play it. It's sad, but that's the reality of Apple today. Most software was made for small amounts of data, not for 256GB or 1TB of storage space on a smartphone, and further their introduction of Music streaming and clouds just messes it all up.

I don't use iPhoto / Apple Photos
I don't use iPhoto (or Apple Photos as it is called now). It's just a really bad software that cannot hold that many photos without going into self-destruction mode. And it's extremely slow to copy pictures in and out of iPhoto. Often it crashes during export/copy; amongst other things because the file names overlap so you can't copy them all to one destination.
The only thing I use Apple Photos for is importing photos from my iPhone and making sure I delete from phone after. It's the only way to delete all photos from the phone, once copied. If you do it another way, you'll have to check each photo on the phone to delete them.
Part of my digital workflow is that I have one original and one backup. If you have photos on both your phone and in archive, next time you copy over, you double or triple the photos. It's not the end of the world, but as you move from hundreds of photos to thousands, it becomes a mess you will never have time to clean it up.
Once I have copied my photos off the phone and into my normal workflow, I put them in an event folder like “1748 iPhone Photos May-June 2017”. Then I delete them in iPhotos / Apple Photos (It takes 30 days for the photos to actually leave the hard drive when deleted in iPhotos / Apple Photos, but they will eventually be gone).
From the “1748 iPhone Photos May-June 2017” I import these via Lightroom so as to be able to add keywords and other data to the photos, so that I might actually be able to find the photos at a later time. The way I use my iPhone, there's quite some photos I don't have to do anything to because they are not important. My important photos I always take with a real camera.
| |
|
|
|
| |
How to clean out Apple Photos from the iPhone and the computer |
|
|
| |
By Thorsten von Overgaard |
|
| |
|
|
|
Keeping my Apple Photos on the iPhone clean
The point in this is not to have photos in iPhoto / Apple Photos, and to clean out photos from my iPhone once they are in the real archive. Once I have copied photographs from the iPhone to the computer, they are deleted from the phone and the phone is clean again.

Make sure to click "Delete items after import" so pictures are removed from the phone once downloaded to the computer. If you forget to do so, you will have pictures in both places, making it impossible to organize an archive. And another small detail: You cannot remove the photos from the iPhone other than deleting them manually by hand (clicking on each and punch "delete").
Apple iPhoto / Apple Photos is not a photo archive
For many reasons, the Apple Photos is not your photo archive. The main rule for anyone who creates digital files of any kind is that you stay in control of your files, you have ownership of them, and you maintain their integrity; they are not taken over by any software or cloud
Generally, for apps like iPhoto and Lightroom, all notes, keywords, etc. that you add to photos stays in the software and are not in the photos. That means that all the work you have done to find your photos, once they leave the Apple Photos or Lightroom, those notes are gone. They sit in the software application!
So your workflow with photographs has to include a way to have the keywords and other data written down to the actual photo file. In Lightroom you have to click "Export to XMP file" and the data will be written into the sidecar of the DNG or RAW file. In Photos, it stays in the application. Most people don't know till they trash the software and realize they have nothing left. That's too late.
In Apple Photos, the image files are hidden in one file, the so-called “Photos Library” which you will see grow from a few GB to much more. You can actually see what's inside it by clicking Control + “Photos Library” and then a menu shows up where you can choose “See Package Content” which will let you see the folders inside the “Photos Library”. One of the many folders will contain the folder with the actual originals which you can then move out or copy out of “Photos Library” so as to take back the control of your files.
When you try to copy a large number of pictures (1,000 or so), Apple Photos will usually stop working or encounter some error. So now you got two of 660 files or something and you don't know which was copied and which were not. Apple Photos require constant monitoring to be sure it does what you thought was a simple copy process.
I don't know why Apple made Apple Photos. It's an old attempt to help you organize your photos, from long before we took a lot of mobile photos, and then it became part of the iCloud where you can subscribe to services as sync, backup, etc. It was never meant to allow you to gain control over your own files. It will grow to become an even bigger mess, and one day it will disappear because you didn't take over responsibility for your images.
So yes, you must get them out of there, put them in your own folders, make your own backup, and establish an archive and workflow that
you actually control. Apple doesn't do it for you.
Stay out of the iCloud
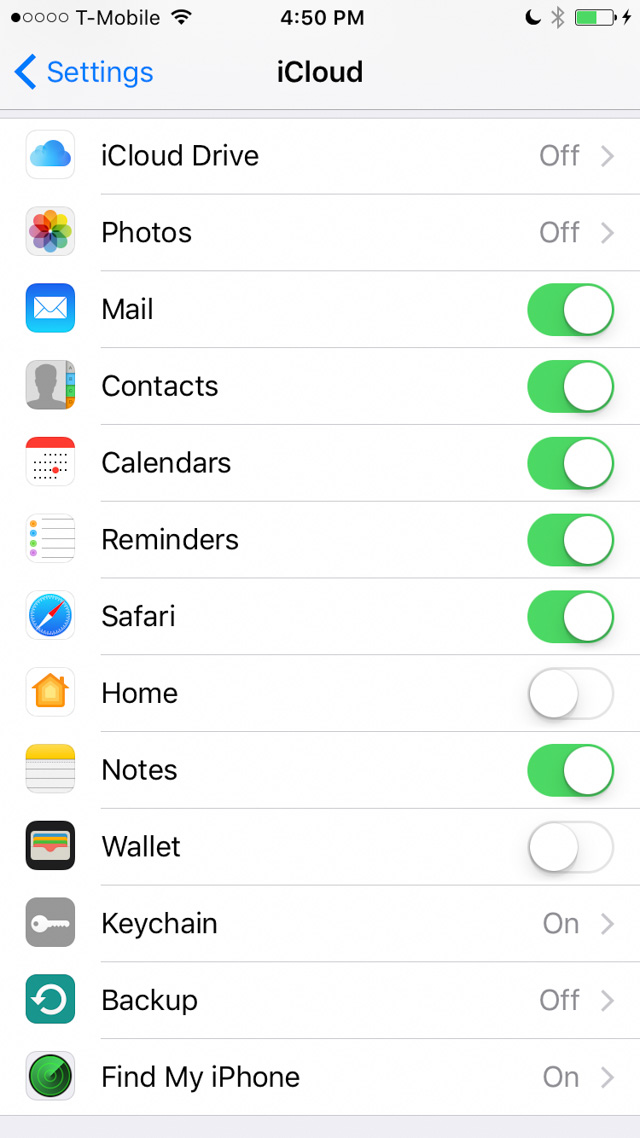
Make sure to keep your computer and phone out of the cloud. Often when you update the OSX in the phone and computer, and for sure whenever you get a new device, all the cloud services will be turned on by default. So first thing, check the settings in the computer and in the phone and make sure it is turned off.
The basic rule is that what you create is yours. The iCloud is set up so your files mainly stays in the cloud, so when you want to disconnect calendar, photos, iCloud Drive or any other thing, Apple will keep your files in their cloud and remove them from your device!
On your computer, disconnect from iCloud Drive and Photos (syncing):
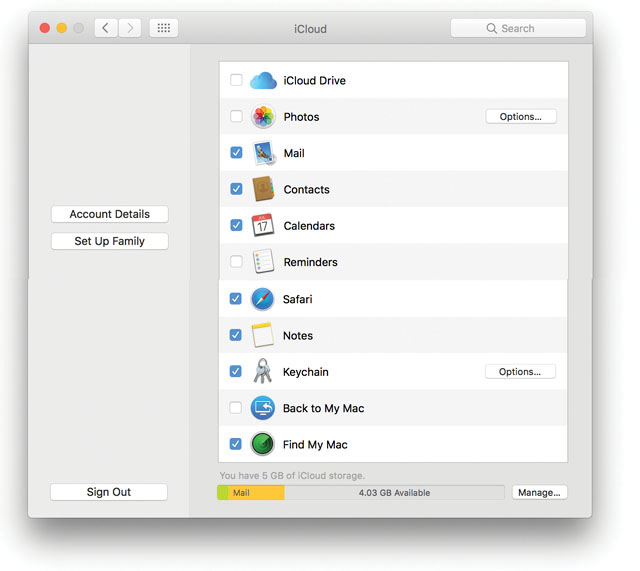
On your phone, make sure to disconnect from iCloud Drive, Photos and Backup:
The iCloud is not a backup
The iCloud is a synchronizing service, not a backup. Apple doesn't have a backup of your iCloud.
What ... does that mean?
It means that whenever you make a change, deliberately or by error, on one device, that change takes effect on your other connected devices. There is usually no way of reverting it back (though recently Apple have given the possibility to revert back a few days and replace the most recent sync with one from a few days ago).
If you by error delete an address or you entire address book, it's deleted on all devices within minutes. So naturally, you would think Apple has a backup. They don't (though, in recent years they claim that you can contact their center in Ireland and they keep a backup for 7 days; but this is not a service they officially offer).
To have a backup, you have to make a Time Machine backup, or a manual backup (copying all files/computer to and external hard drive) or use DropBox or BackBlaze.
I suggest to do a manual backup (meaning copying from your computer to a hard drive), because if you don't know what's backed up and you can't check it easily, you don't know if you have a backup until the moment you actually need it. Meaning, if you find a "smart and fancy" backup software, how will you check that it actually does back up everything? You don't know till you need the backup, and then realize it did or didnt do it properly. Copying from cputer to hard drive, you can compare and check number of files, that it did it, that the files are in fact on the external hard drive.
External backup drive is where you simply connect an external hard drive and copy your folders and files over manually. The advantage is that it's low-tech, easy to understand, easy to check that it actually was copied. This is an important point, because mostly people won't check if their backup was done until the day they actually need the backup.
In Apple OSX, the Library is hidden these days. You can reveal the Library by holding down alt-option when looking at the Go menu in Finder. The Library holds settings and other things you might want to copy to your backup (Lightroom presets, your actual Address Book files and more). Apple decided to hide the Library a few years ago so as to avoid that the "stupid users" would mess with the system.
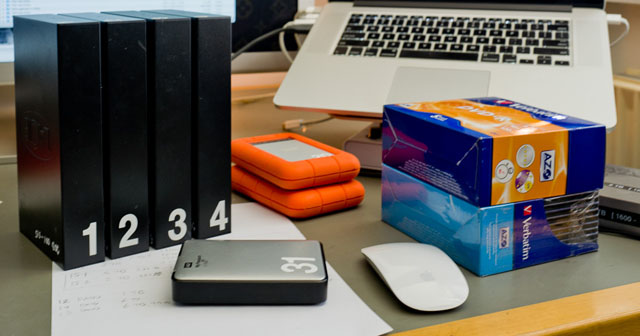
External hard drives is the most low-tech and simple way to back up yor computer and archives. I put my backup drives in a bank box.
Time Machine is great for making a backup and then set up a new computer you just bought. In a matter of hours the new device is set up just as the old one. Though, watch out: If you have had iCloud Drive set up on one of the devices (the old or new), those files seem to be missing. Another reason to stay away from clouds (because you can't understand them and thus can't control them).
I found that looking for two or three month old files on Time Machine, they are simply not there. And that's when you realize you cannot just "open Time Machine" and look through folders. It's a shell of just one backup file, and without the Time Machine app you cannot get to any of the content.
In other words, it's one of those backup apps where you cross your fingers and hope they know how it works.
| |
 |
| |
DropBox sync runs in the background |
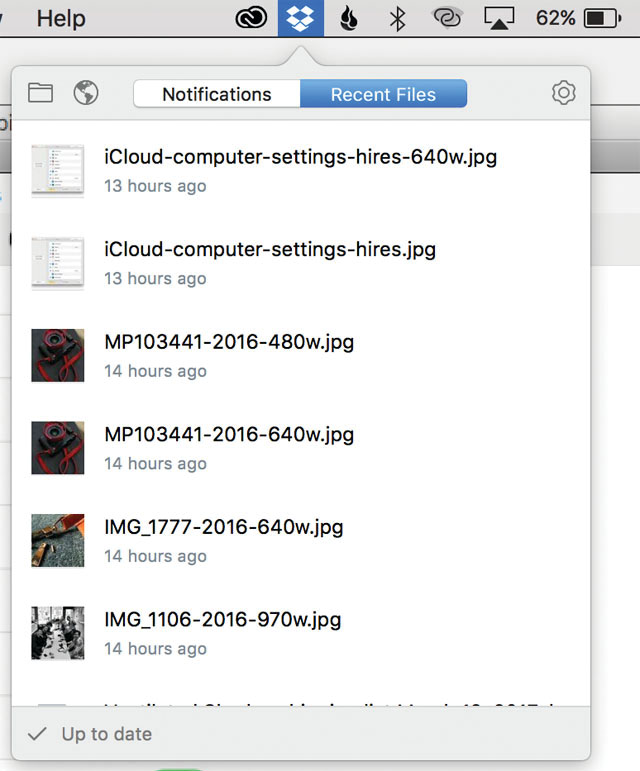
DropBox can be another confusion added to your workflow: After a while you can't figure out if the files are on DropBox or on your computer. People who are out of space on their hard drive will ask, "I can delete it here, it's on DropBox, right?" and the answer is no. If you delete on your computer, DropBox will synch that and remove it as well!
DropBox does provide that you can revert files 30 days back (and 365 days with a Business subscription) in case you delete something you shouldn't. That's something Apple iCloud doesn't.
But mainly, DropBox is a sync service. It's great when you have several devices you want to have the same files in archive, updated with the latest changes made on whichever device.
Syncing devices has the danger that is one device is in the hands of someone who doesn't know what they're doing, they might delete something they shouldn't have. Few minutes later it's gone on all devices.
| |
 |
| |
Backblaze backup service runs in the background |
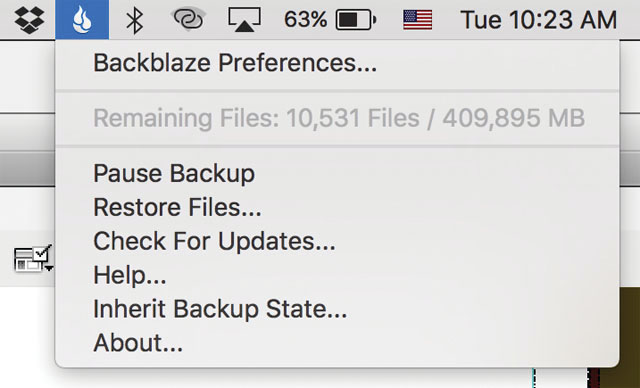
Backblaze is a service that simply backs up your device and all connected hard drives. It's not a sync service but a last resort backup. Just make sure you are actually connecting your computer and drives long enough for them to have been backed up.
Once you are on top of the backup, you are pretty safe: Any time you lose a hard drive or computer, you ask Backblaze to send the files and they'll (actually!) send a SSD hard drive to anywhere in the world with your files; at no extra cost.
It works as a great last resort backup in case everything else failed; and it costs only $5 a month.
Related articles:
Advice for photographers: "Which computer to get"
Advice for photographers: "Organizing old photo archives"
Advice for photogtraphers: "How to write keywords into your photographs"
Advice on Apple Photos and smartphones: "How to sync your photo archive to your iPhone"
Advice for photographers: "The ultimate backup is in the bank"
Advice for photographers: "Calibrating computer screen for photographers"
Thorsten Overgaard's workflow extension course: Lightroom Survival Kit
Thorsten Overgaard's workflow extension course: Capture One Survival Kit
Thorsten Overgaard's Workflow Masterclass: The Art of Photo Editing - Photographer's Masterclass
More to come ...
I hope you enjoyed today's The Story Behind That Picture. As always, feel free to write me at thorsten@overgaard.dk with suggestions, comments and ideas.
 |
NEW VERSION 11.3 |
 |
| |
 |
|
| |
|
| |
|
|
|
|
| |
|
| |
|
|
| |
Buy Now. Instant delivery.
New Version 11.3
ONLY $698.00

Now includes
4+ hours of
video tutorials.
100% satisfaction
or 100% refund.
More info.
|
|
| |
#2130-1121-3 |
|
| |
|
|
| |
Update to Version 11.3
Apply
code "UPDATE113" on checkout to get this complete version 11.3 update.
$298.00

Updates all previous Surival Kit versions since 2009. |
|
| |
|
|
Buy the complete new
Lightroom Survival Kit 11.3
The Legendary Tutorial for Photographers
Brand-new JUNE 2022-version.
Now with brand-new 4+ hours of video tutorials.
New sections on compostition and storytelling.
How to edit color photos.
How to edit black & white photos.
How to do keywords logical and easy.
The most successful photo editing kit ever
Photographer Thorsten Overgaard first released the Lightroom Survival Kit in 2009 and have honed it with new and fresh updates. This Version 11 is the most radical updated and renewed version ever, four years in the making.

Professional workflow experience made simple, logical and easy to use.
Master editor makes it simple to understand
The Survival Kit is unique and one-of-a-kind being made for photographers for photographers. When someone understands their subject, they can explain it so it is easy to understand. The hallmark of Thorsten Overgaard is to make expert knowledge shown and told in a way so anyone can apply it.
Hands-on advice that works
With a 450 pages workbook and 4+ hours of video, every element of digital photography is touched on, in handy chapters and pre-flight checklists. Editing of color vs black and white photos, keywording, cropping of images, fine-tuning of tones, color balance and color control, export of originals, printing, archiving and backup, and much more.
Comes with the Overgaard Leica Presets (Value $48)
The Lightroom Survival Kit comes with Thorsten Overgaard's special-made Lightroom Presets for all digital cameras and for Leica digital cameras.
Understand all from camera to the final print
Chapters in this version goes over the background for High Dynamic Range (HDR), digital raw files and how to set up a professional photography workflow, from calibrating the screen to editing in Lightroom, and to making a final print. And more ...
10+ years experience in one package
No need to spend years figuring out the smartest way to do things when you can tap into the best way of doing things right here. The workflow of Thorsten Overgaard as been refined through years of field work with more than a thousand workshop attendees.
This method of workflow now used by thousands
The Survival Kit has been taught to thousands in workshops and in this Survival Kit. What does it do? It make you enjoy taking and making photos, and it increases your production considerabely. Most important of all, it'll give you back ownership of your files (which you will understand why is so important, once you have bought the Survival Kit and started applying its methods).
| |
|
|
| |
"Thorsten's methodology is perhaps not what hardware-, software- and cloud-companies want us to do, but as a former IT engineer I can only acknowledge his views about preserving our digital heritage. This workflow explained is for me the best I have ever seen".
★★★★★ |
|
| |
|
|
Video tutorials, image files, presets, checklists, definitions, tutorials of Lightroom, that boils down years of experience to a workflow you can implement in less than one day.
Start working in minutes. |
|
|
| |
|
| |
|
| |
|
| |
|
| |
|
| |
|
|
|
|
 |
|
 |
![]()
