How to move your image archive from the cloud-based Lightroom back to the "real" Lightroom Classic desktop-based version
If you have mistakenly started using Lightroom (pictures in the cloud) and realize you should have used Lightroom Classic (pictures on the computer), here is a guide to solve the situation and get back on the right track.
It's a common mistake to believe that Lightroom CC is "the new thing" and then find out that that version only have limited features, and require internet access to upload, sync and download files. Not to mention that you now have to pay for cloud storage every month to have your pictures.
In any case, here is a quick guide on how to migrate back to Lightroom Classic from the cloud-based Lightroom CC.
This tutorial will show you how to move from Lightroom CC to Lightroom Classic in a few quick steps?.
Step 1: Install both Lightroom Classic and Lightroom on your computer
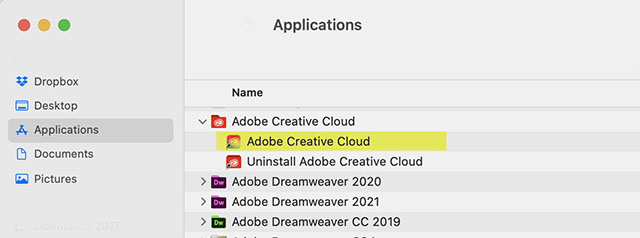
Open Adobe Creative Cloud from your Applications folder. Despite the name, it is not a cloud, but a software on your computer to download and update Adobe products.
Once it is open, you'll see a list of the Adobe software that is in your subscription:
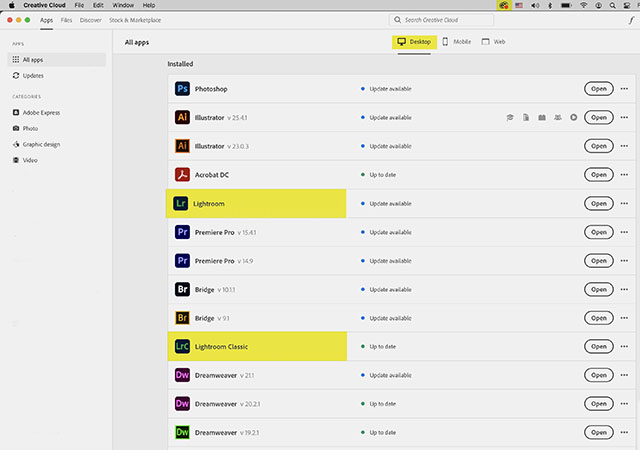
If both versions are not on the computer, scroll further down to download the missing version(s):

As you can see, the confusion is complete. "Lightroom" is the same as "Lightroom CC" that is the cloud version (and the one we wants to get rid of).
“Lightroom Classic” is the desktop-based version where the files are on the computer. In the past Adobe named that version "Lightroom CC" or simply "Lightroom". So if you feel dizzy and confused, it's no wonder. The names are the same but the versions are different - simply used to make you buy what Adobe wants you to think is the best.
If you don't have access to both versions of Lightroom, you may need to adjust your plan. The plan to have is the one that has Lightroom and Lightroom Classic. Don’t get the Lightroom plan alone as it is only the cloud-based version.

Now you have both versions: This way we can have both versions of the software talk with each other "live" and get the content moved to Lightroom Classic.
Step 2: Back up photos to the Creative Cloud
Next, make sure all the photos you want to move from Lightroom CC to Lightroom Classic are backed up to your storage space on the Creative Cloud.
To do this, open Lightroom/Lightroom CC and look for the cloud symbol found at the top right of your Lightroom. Click on that cloud symbol to save them.
A box will open and let you know when everything is synced and backed up.

A female Nikon film photographer in New York. © Thorsten Overgaard.
Step 3: Open Lightroom Classic and start syncing with Lightroom CC
In this next step, open Lightroom Classic. In the upper right corner of Lightroom Classic, you will find a symbol just like in the last step. When you click on the cloud symbol, a dialog box will open.
You will see a button called "Start Syncing," which will allow you to sync your Lightroom CC catalog to Lightroom Classic. To begin the syncing process, click that button.
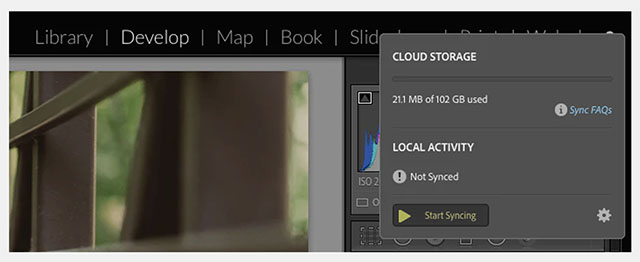
When you press "Start Syncing", you will see a big, scary warning from Lightroom about overwriting things. Just make sure you are syncing your current catalog and then click accept.
Step 4: Wait for the photos to sync
Depending on how many photos you have in Lightroom/Lightroom CC, it can take a while to sync them with Lightroom Classic. Let Lightroom do its work and don’t interrupt it. Just hang in there. A few things you might want to know about this process, are these:
- This process is not perfect. All the photos that you sync to Lightroom Classic will be downloaded into one single "From Lightroom CC" collection set, and while not optimal, at least they will all be migrated to Lightroom Classic.
- In Lightroom Classic, you can always Create new folder by right-clicking a folder (on Mac you hold down the control button and click on a folder):
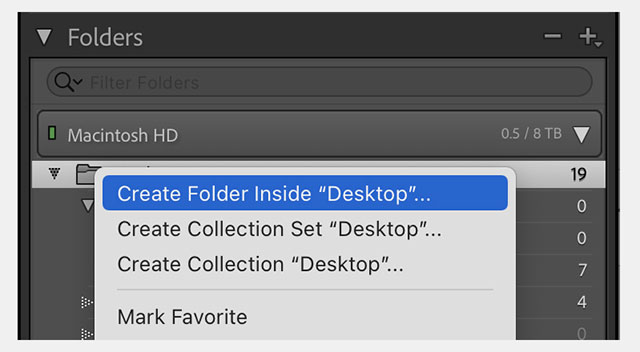
Now you have a new empty folder in Lightroom, and you created a real folder on the desktop (or where ever you choose it to be). Now you can drag and drop one of many at the time files from one folder to the other, and they will move from one folder on the other on the hard drive accordingly. You can create a great mess with this, but you can also use it to reorganize your picture files to be in the correct, different folders and not just one folder).
- Any photos you originally imported and added to Lightroom CC will have the original files downloaded and added to Lightroom Classic.
- 1) If you had photos that you originally imported into Lightroom Classic (and then synced or shared smart previews in Lightroom CC), only the smart previews will be downloaded and added to Lightroom Classic. The originals should still be in Lightroom Classic.
Step 5: Turn off syncing
This final step will ensure that your images are not deleted or overwritten. Once all your photos have finished syncing, make sure to turn off syncing.
This is easy to do. Just move to the Collections Panel and begin turning off syncing by clicking on the icon with arrows on both ends that is next to each of the new collections within your "From Lightroom" collection set.
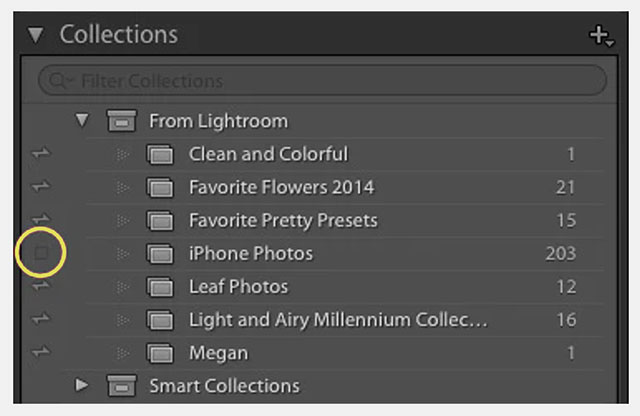
This way you disconnect from the cloud and the files are now on your computer. You are officially done! From now on use Lightroom Classic to manage and edit your photos!
Step 6: Checking that it’s all there
You should always be able to answer the question, “Where are my file?” and if you have no idea where the original pictures are on your computer, you may check in Lightroom Classic by right-clicking a file (on Mac, hold down control and click on the picture):
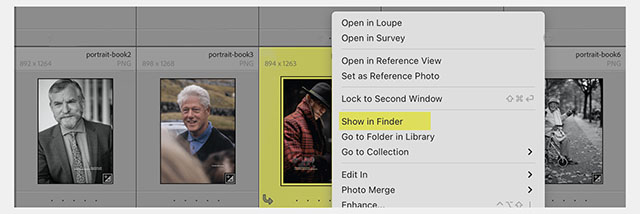
By choosing Show in Finder, a window wil open up with the folder where that picture is. And you can then see the folder structure. You have to to perform some investigative work with searching in Spotlight, but eventually you should be able to find the folder and sun-folders with ALL your photos.
This should give your confidence and certainty that you can now determine Lightroom CC and the cloud storage completely as you have them on your computer.
And you should backup your computer now and then as well, to external hard drives that you store in a safe place (usually in another building, in case of fire or theft).
Generally, you should be in total control of your files. You should import and edit, then export final pictures to your own archive so they are ready for use in print and online. And store away digital negatives on external drives. You should be holding your pictures in a software (and even less in a cloud). How to get a professional workflow that makes editing fast and fun again, secures your files and make it all sing, look at my industry-standard Lightroom Survival Kit I have been writing and updating on workflow since 2009.
More to come
Bon voyage with it all, and enjoy to be back in control of your images! For more on workflow, look at my Lightroom Survival Kit and Capture One Survival Kit.
Sign up for the newsletter to stay in the know. As always, feel free to email me with suggestions, questions and ideas.
/Thorsten Overgaard
 |
NEW VERSION 11.3 |
 |
| |
 |
|
| |
|
| |
|
|
|
|
| |
|
| |
|
|
| |
Buy Now. Instant delivery.
New Version 11.3
ONLY $698.00

Now includes
4+ hours of
video tutorials.
100% satisfaction
or 100% refund.
More info.
|
|
| |
#2130-1121-3 |
|
| |
|
|
| |
Update to Version 11.3
Apply
code "UPDATE113" on checkout to get this complete version 11.3 update.
$298.00

Updates all previous Surival Kit versions since 2009. |
|
| |
|
|
Buy the complete new
Lightroom Survival Kit 11.3
The Legendary Tutorial for Photographers
Brand-new JUNE 2022-version.
Now with brand-new 4+ hours of video tutorials.
New sections on compostition and storytelling.
How to edit color photos.
How to edit black & white photos.
How to do keywords logical and easy.
The most successful photo editing kit ever
Photographer Thorsten Overgaard first released the Lightroom Survival Kit in 2009 and have honed it with new and fresh updates. This Version 11 is the most radical updated and renewed version ever, four years in the making.

Professional workflow experience made simple, logical and easy to use.
Master editor makes it simple to understand
The Survival Kit is unique and one-of-a-kind being made for photographers for photographers. When someone understands their subject, they can explain it so it is easy to understand. The hallmark of Thorsten Overgaard is to make expert knowledge shown and told in a way so anyone can apply it.
Hands-on advice that works
With a 450 pages workbook and 4+ hours of video, every element of digital photography is touched on, in handy chapters and pre-flight checklists. Editing of color vs black and white photos, keywording, cropping of images, fine-tuning of tones, color balance and color control, export of originals, printing, archiving and backup, and much more.
Comes with the Overgaard Leica Presets (Value $48)
The Lightroom Survival Kit comes with Thorsten Overgaard's special-made Lightroom Presets for all digital cameras and for Leica digital cameras.
Understand all from camera to the final print
Chapters in this version goes over the background for High Dynamic Range (HDR), digital raw files and how to set up a professional photography workflow, from calibrating the screen to editing in Lightroom, and to making a final print. And more ...
10+ years experience in one package
No need to spend years figuring out the smartest way to do things when you can tap into the best way of doing things right here. The workflow of Thorsten Overgaard as been refined through years of field work with more than a thousand workshop attendees.
This method of workflow now used by thousands
The Survival Kit has been taught to thousands in workshops and in this Survival Kit. What does it do? It make you enjoy taking and making photos, and it increases your production considerabely. Most important of all, it'll give you back ownership of your files (which you will understand why is so important, once you have bought the Survival Kit and started applying its methods).
| |
|
|
| |
"Thorsten's methodology is perhaps not what hardware-, software- and cloud-companies want us to do, but as a former IT engineer I can only acknowledge his views about preserving our digital heritage. This workflow explained is for me the best I have ever seen".
★★★★★ |
|
| |
|
|
Video tutorials, image files, presets, checklists, definitions, tutorials of Lightroom, that boils down years of experience to a workflow you can implement in less than one day.
Start working in minutes. |
|
|
| |
|
| |
|
| |
|
| |
|
| |
|
| |
|
|
|
|
 |
|
 |
![]()
